ラベル vim の投稿を表示しています。 すべての投稿を表示

2012年6月24日日曜日

Sync Vim with Google Calendar(3/3)

Setting of viske.vim

Next, you can modify your .vimrc to activate Google Calendar Pulgin.

If you installed viske.vim by Bundle, you should check the path of "gcal.rb" first. Please place the script at a below location.

$VIMHOME/ruby/gcal.rb

Then add below settings to .vim.rc so as to activate sync plugin. Please substitute your own value for {CALENDAR-ID}.

let g:viskeGcalId = "{CALENDAR-ID}" 
cal viske#setSyncFunc("viske#gcal")

{CALENDAR-ID} might be the same as a google account. You can check an actual Calendar-ID at a setting of Google Calendar.

Now you can synchronize viske schedule with Google Calendar. Congratulation!!

Parameters

You can modify the behavior of this scripts by below parameters.

Parameter nameDescriptionexample
g:viskeGcalIDCalencar ID to be synchronizedvimyum@gmail.com
g:viskeGcalGetScriptPath to gcal.rb$HOME . ".vim/ruby/gcal.rb"
g:viskeGcalTZoneTime zone"+0900"
g:viskeGcalAuthFilePath to AOuth token$HOME . ".google-api.yaml"
g:viskeSyncNoConfIf it exists, viske does not confirm before synchronizing."true"
g:viskeSyncReadOnlyIf it exists, viske does not apply local change to Google calendar."true"

Caution

This script may contain a lot of bugs. It can damage your data on google calendar by unexpected behavior. Pleas kindly use these scripts at your own risk.

Sync Vim with Google Calendar(1/3)

Get Client-ID、Client-Secret

Client-ID and Client-Secret are required to use Google Calendar API v3, . Let's start with accessing the Google API Console with your Google account. You might see a below image. Click the "Create Project...".

On next screen, click a toggle buttom next to "Calendar API". If you can not see the button, please check the "Services" is selected on side menu.

Proceed the confirmation with clicking "accept" twice. Finishing activation, you can see the below image.

Next, click the "API Access" on the left side menu.

You can see the "Create an OAuth 2.0 Client ID...", and click it.

You can input a product name of your choice, and click "Next".

Choose "Installed application" as "Application type". Then click "Create Client ID".

You got the "Client ID" and "Client Secret" on the following screen.

These values are required to get OAuth token on next step. Let's memorize it.

Get OAuth token

next step.

Sync Vim with Google Calendar(2/3)

Install libraries

You can install required libraries to access the Google API with RubyGems. If you have not installed RubyGems, you should install RubyGems first.

sudo aptitude install rubygems

Now you can install libraries with RubyGems as below.

sudo gem install google-api-client
sudo gem install --remote sinatra httpadapter extlib dm-sqlite-adapter

Get OAuth Token

Let's obtain an OAuth token using "Client ID" and "Client Secret" . Input below command. Please substitute your own values for {CLIENT-ID} and {CLIENT-SECRET}.

/var/lib/gems/1.8/bin/google-api oauth-2-login \
  --scope=https://www.googleapis.com/auth/calendar \
  --client-id={CLENT-ID} \
  --client-secret={CLIENT-SECRET}

Path of google-api is changed according to your environment. My mac environment, the path is a below one.

/Library/Ruby/Gems/1.8/gems/google-api-client-0.4.4/bin/google-api

Once you input the abobe command, a web browser will be launched and requires an acceptance. If you can accept, let give it an access authority.

After you accept the request, New OAuth token file ".google-aip.yaml" would be created in your home directory.

Setting of vise.vim

next step

2012年6月22日金曜日

Googleカレンダーと同期させる(3/3)

viske.vimをGoogleカレンダーと同期させる(3/3)

viske.vimの設定

OAuthのトークンを取得したら、Googleカレンダー同期プラグインを有効にするだけです。OAuthトークンの取得がまだの場合はこちらの記事を参照してください。

Googleカレンダーとの同期プラグインはviske.vimのパッケージに同梱しています。下記の2つのファイルがGoogleカレンダー同期用のファイルです。Bundleなどでインストールした場合は、gcal.rbの場所が異なります。下記の位置にコピーしてください。

$VIMHOME/ruby/gcal.rb
$VIMHOME/autoload/viske/gcal.vim

同期機能を有効にするには、設定ファイル(.vimrc)に下記を追加します。

let g:viskeGcalId = "カレンダーID" 
cal viske#setSyncFunc("viske#gcal")

カレンダーIDは一般的にはGoogleアカウントです。Googleカレンダーにログインして、設定から確認できます。

設定

その他、Googleカレンダー同期プラグインには、下記の設定が可能です。

パラメータ内容設定例
g:viskeGcalID同期するカレンダーのIDvimyum@gmail.com
g:viskeGcalGetScriptgcal.rbのパス$HOME . ".vim/ruby/gcal.rb"
g:viskeGcalTZoneタイムゾーン"+0900"
g:viskeGcalAuthFileOAuthトークンのパス$HOME . ".google-api.yaml"
g:viskeSyncNoConf同期時に確認しない"true"
g:viskeSyncReadOnlyVimの変更をGoogleカレンダーに反映しない"true"

注意事項

本スクリプトは素人が試行錯誤して作ったもののため、多分にバグを含んでいます。もしかすると、意図しない挙動によりあなたの大事なGoogleカレンダー上のスケジュールを破壊してしまうかもしれません。ご使用の場合は十重にご承知置きください。

Googleカレンダーとの同期(2/3)

viske.vimをGoogleカレンダーと同期させる(2/3)

ライブラリのインストール

Google CalendarのクライアントIDとクライアントシークレットを取得したら、次はライブラリのインストールです。まだ取得していない場合は前回の記事を参照してください。

Google Calendarにrubyでアクセスするために必要なライブラリはRubyGemsでインストールできます。RubyGemsをインストールしていない場合は先にRubyGemsをインストールしましょう。Ubuntuにてaptitudeでインストールする場合はこんなかんじです。

sudo aptitude install rubygems

Windowsにインストールする場合は、下記のサイトあたりがわかりやすいと思います。

Num.b:Windows に Ruby と RubyGems を入れる

RubyGemsをインストールしたら、RubyGemsを使って必要なライブラリをインストールします。

sudo gem install google-api-client
sudo gem install --remote sinatra httpadapter extlib dm-sqlite-adapter

OAuthトークンの取得

前回取得したクライアントIDとクライアントシークレットを使ってOAuthのトークンを取得します。

/var/lib/gems/1.8/bin/google-api oauth-2-login \
  --scope=https://www.googleapis.com/auth/calendar \
  --client-id=クライアントID \
  --client-secret=クライアントシークレット

google-apiコマンドのパスは環境によって異なります。Macでは下記のパスにインストールされました。

/Library/Ruby/Gems/1.8/gems/google-api-client-0.4.4/bin/google-api

上のコマンドが成功すれば、Webブラウザが起動し、認証を求める下のような画面が表示されます。問題が無ければ、アクセスを許可しましょう。

成功すれば、ホームディレクトリ以下に".google-aip.yaml"というファイルができているはずです。以降、このファイルをOAuthトークンと呼びます。

viske.vimの設定

次の記事に続きます。

Googleカレンダーとの同期(1/3)

viske.vimをGoogleカレンダーと同期させる(1/3)

Client ID、Client Secreの取得

同期させるにはGoogle APIを使用するため、同期させるカレンダーについてClient ID, Client Secretというものが必要になります。まずはGoogle API Consoleにアクセスします。はじめての場合、下のような画面が出るはずです。真ん中の"Create Project..."をクリックしましょう。

画面が変わるので、Calendar APIの横のスライドバーをしましょう。画面が異なる場合は左端のメニューで"Services"になっているか確認してください。

同意確認が2回でてくるので、内容を確認して"accept"を押します。下記の画面のようにCalendar APIのスライドバーが"ON"になればOKです。

次に、画面左のメニューから"API Access"を選んでください

切り替わった画面の真ん中にある"Create an OAuth 2.0 Client ID..."をクリックします。

"product name"を適当に入力して、"next"をクリックします。

"Application type"は"Installed application"を選択して、"Create Client ID"をクリックします。

切り替わった下記の画面に表示されているのが、それぞれ"Client ID"と"Client Secret"になります。

これらの値は同期において必要となるため、どこかにメモしておきましょう

OAuthのトークンを取得する

次の記事に続きます。

2012年6月19日火曜日

Vim Scheduler (viske.vim)

Overview

You can manage your tasks and todos with graphical time-line calendar on Vim. You can synchronize viske schedule with Google Calendar as well.


How to Use

Preparation

Create a directory to save task file. default directory path is "$HOME/Schedule/". You can change the directory path by setting "g:ViskeDir"

Start / Exit

  • Start: input ":Viske"
  • Quit: input "q" in normal mode. changed tasks are saved automatically.

Registration of Tasks

  1. Select the period on the time-line at which you want to make a task using visual mode.
  2. Enter a Return
  3. The cursor moves to sub-window and it becomes insert mode.
  4. Input your task.
  5. Enter a "Ctrl+r"

the sentence following ">" becomes a summary that is diplayed on the main window. You can describe more details below second line.

The minimum time unit is 30 minutes on main window. If you want to appoint accurate start and end time of tasks, you can edit the time directly in sub window.

Type of Task

During inputing a task in sub-window, you can appoint a type of a task with adding a "mark" at the head of a sentence. Types of tasks can be changed by setting "g:ViskeTaskTypeLabel"

markType
*Whole day
*+Todo
*!Todo(Important)
*+Todo(Done)
noneTask1
#Task2 (Leaving)
!Task3 (Important)
%Task4 (Meeting)
+Task5 (Private)

Keymappings

Main Window (top of the screen)
Keydesclocation
qquit after saveall
Qquit without saveall
RSave & Load tasksall
j, kMove cursor to upward/downward time-lineall
J, KMove cursor to upward/downward time-line or tasksall
h, lProceed cursor to 30 minutes later / earlierall
H, LProceed cursor to an hour later / earlierall
<, >Move a task to 30 minutes later / earlieron tasks
(, )Set the start time of a task ahead / back 30 minuteson tasks
{, }Set the end time of a task ahead / back 30 minuteson tasks
yyYank a taskon tasks
pPaste a taskon time-lines
ddDelete a taskon tasks
ccChange a taskon tasks
*Change a task type to Task1on tasks
#Change a task type to Task2on tasks
!Change a task type to Task3on tasks
+Change a task type to Task4on tasks
%Change a task type to Task5on tasks
+Change a whole day task to TODOwhole day task
*Change a TODO to whole day taskon TODO
-Make a status of TODO doneon TODO
!Make a status of TODO importanton TODO
Sub-Window (left bottom on the screen)
KeyDescMode
Ctrl+NSet start/end time ahead 15 minutesinsert
Ctrl+PSet start/end time back 15 minutesinsert
Ctrl+EToggle the target time (start/end time)insert
Ctrl+RRegister a taskall
Ctrl+ReturnRegister a taskall
ReturnRegister a tasknormal
Ctrl+WCancel inputing taskall
Calendar-Window
KeyDesc
ReturnJump to the date under cursor
Ctrl+NGo ahead next month
Ctrl+PGo ahead previous month

Commands

Commanddesc
:ViskeStart the Viske.
:ViskePrevMonthShow Previous month.
:ViskeNextMonthShow Next month.

Settings

VariablesDescExample
g:ViskeSubWinHeightHeight of the Sub-Window7
g:ViskeCalWinWidthWidth of the Calendar-Window25
g:ViskeDira directory path to save task files/var/Schedule/
g:ViskecutDownMsgTrim the summary of tasks or not0(default),1(trimming)
g:ViskeStartTimeStart time of a day8
g:ViskeEndTimeEnd time of a day20
g:ViskeWidthFuzzyAcceptable length that run over a screen4
g:ViskeLangLanguage setting"jp"
g:ViskeTaskTypeLabelDisplay name of each task typerefer following
g:ViskeDayLabelDisplay name of a dayrefer following

To modify the display name of tasks or days, you can refer following example of setting in vim.rc

let g:ViskeTaskTypeLabel=['\ ', 'seminar', 'family', 'job', 'canceled', 'TODO']
let g:ViskeDayLabel = ['S', 'M', 'Tu', 'W', 'Th', 'F', 'S']
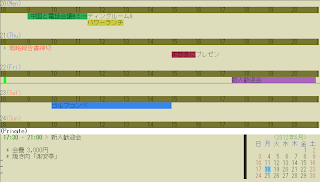
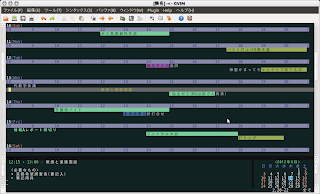
Color Scheme

Viske includes color scheme for 256 color terms.viske.bright256 has a bright background color and viske.dark256 has a dark background color.

colorscheme desert256 "General Colorscheme
colorscheme viske.dark256 "Viske Colorscheme

If you want to customize each color of Viske, you can reffer the below image.
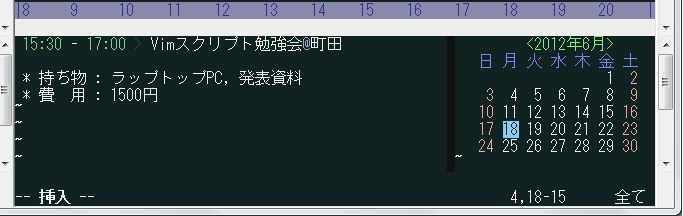
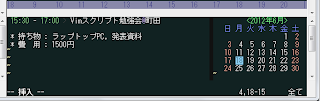
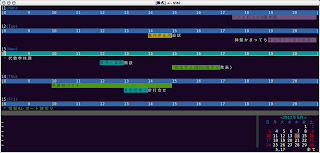
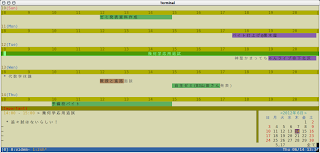
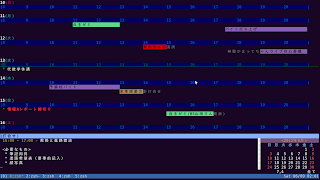

Screen shots

gVim default color

16 default color

colorscheme: bright256

colorscheme: dark256

Download / Install

with Vundle

add the bellow setting to your vim.rc, and input command ":BundleInstall" on vim.

Bundle 'vimyum/viske'

without Vundle

Download from below site(GitHub) and deploy properly.

https://github.com/vimyum/viske

2012年6月18日月曜日

Vimでスケジュール帳 (viske.vim)

概要

Vimで予定管理を行うためのプラグインです。タイムラインで予定を管理できます。Rubyが動く環境ならば、Googleカレンダーと同期もできます。calendar.vimの日記機能では物足りなかったので、初めてのVimスクリプトとして作ってみました。


使い方

準備

ファイルを保存するディレクトリを作成します。デフォルトでは"$HOME/Schedule/"です。保存先ディレクトリは設定(g:ViskeDir)で変更できます。

起動 / 終了

  • コマンドモードで"Viske"と打てば起動します。
  • "q"で終了します(予定は自動保存)。

予定を登録する

  1. 予定を登録したい時刻を、タイムライン上でビジュアルモードにより選択します。
  2. Returnを押します。
  3. カーソルがサブ画面に移動してインサートモードになります。
  4. 予定を入力してます。
  5. "Ctrl+R"を押せば登録完了です。

サブ画面では、1行目の">"以降がサマリーとなり、メイン画面に表示されます。2行目以降に詳細な内容を記すことも可能です。

サブ画面で予定入力中、30分単位より細かい時刻を設定したい場合は、時刻の文字列を直接編集することで可能です。また、Ctrl+n, Ctrl+pで時刻を15分単位で変更できます。変更する対象(開始、終了)の切り替えはです。

予定の種類

サブ画面での予定入力時に、予定の先頭に記号を付加することで、予定の種類を変更できます。また、予定登録後にメイン画面から予定の種類を変更することもできます。また、Task1〜Task5に割り当てる種別は設定(g:ViskeTaskTypeLabel)で変更可能です。カッコ内はデフォルトの種別になります。

記号種別
*終日予定
*+TODO
*!重要TODO
*+完了済みTODO
なしTask1
#Task2 (出張)
!Task3 (重要)
%Task4 (会議)
+Task5 (私用)

キーマップ

メイン画面(上部)
Key内容操作可能な場所
q保存して終了全て
Q保存せずに終了全て
j、kカーソルを上下の日付に移動全て
J、Kカーソルを上下の日付、タスクに移動全て
h、lカーソル位置を30分進める、遅らせる全て
H、Lカーソル位置を1時間進める、遅らせる全て
ghカーソル位置を今日の日付に移動全て
<、>タスクを30分早める、遅らせるタスク上
(、)タスク開始時刻を30分早める、遅らせるタスク上
{、}タスク終了時刻を30分早める、遅らせるタスク上
yyタスクをヤンクタスク上
pタスクをペーストタイムバー上
ddタスクを削除タスク上
ccタスクを変更するタスク上
*タスクの種類をTask1に変更タスク上
#タスクの種類をTask2に変更タスク上
!タスクの種類をTask3に変更タスク上
+タスクの種類をTask4に変更タスク上
%タスクの種類をTask5に変更タスク上
+終日予定をTODOに変更終日予定上
*TODOを終日予定に変更TODO上
-TODOを完了済みに変更TODO上
!TODOを重要TODOに変更TODO上
サブ画面(左下部)
Key内容モード
Ctrl+N時刻を変更(15分進める)インサート
Ctrl+P時刻を変更(15分遅らせる)インサート
Ctrl+E変更する時刻のターゲットを変える(開始時刻/終了時刻)インサート
Ctrl+R予定を登録する全て
Ctrl+Return予定を登録する全て
Return予定を登録するノーマル
Ctrl+W登録をキャンセルする全て
カレンダー画面(右下部)
Returnカーソル下の日付をメイン画面で開く

設定

設定項目内容設定例
ViskeSubWinHeightサブウィンドウとカレンダー画面の高さを設定7
ViskeCalWinWidthカレンダー画面の横幅を設定25
ViskeDirスケジュールファイルの保存先フォルダ名/var/Schedule/
ViskecutDownMsgタスク名の切詰め設定0(切詰めなし),1(切詰め)
ViskeStartTime1日の始まりの時刻8
ViskeEndTime1日の終わりの時刻20
ViskeWidthFuzzy画面からはみ出ても良い許容値4
ViskeLang言語設定jp, us, cn
ViskeTaskTypeLabelタスクの種類の設定下記参照
ViskeDayLabel曜日の表示設定下記参照

タスクの種類や曜日の表示を変える場合は、下記のように設定します。

 let g:ViskeTaskTypeLabel=['\ ', 'ゼミ', 'サークル', 'バイト', '自宅', 'TODO']
 let g:ViskeDayLabel = ['日曜', '月曜', '火曜', '水曜', '木曜', '金曜', '土曜']

カラースキーマ

256色端末向けのカラースキーマを配布しています。明るい背景色のviske.bright256と暗い背景色のviske.dark256の2つです。.vimrcにて通常のカラースキーマを読み込んだ後に読み込まれるように指定してください。

colorscheme desert256 "通常のカラースキーマ
colorscheme viske.dark256 "Viske用

自分で色を変更する場合は下記の名称を参考にしてください。


スクリーンショット

gVim default color

16 default color

colorscheme: bright256

colorscheme: dark256

ダウンロード / インストール

Vundleで管理している場合

下記の設定を追加して、":BundleInstall"してください。

Bundle 'vimyum/viske'

手動管理の場合

下記のgithubからダウンロードして、適切に配置してください。

https://github.com/vimyum/viske